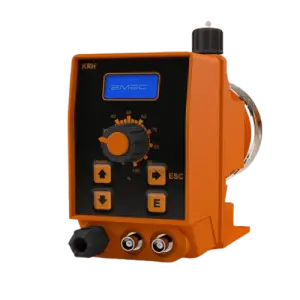
Getting started with the set-up of the Emec KMS MF
The KMS MF series dosing pumps is the ideal solution for low or medium dosing of chemicals. All parameters for operation and set-up are available via a digital keypad and displayed on a backlit LCD screen. The Emec KMS MF metering pump features the following inputs and outputs:
- Standby input
- LEVEL input
- Alarm output (contact)
Flow rate
The flow rate can be determined by the stroke length and the stroke speed. The adjustment knob allows you to set the stroke length between 0% and 100%, only the dosage can be guaranteed within a range of 30% to 100%.
Besides choosing the operating mode, the pump must be prepared by setting the main parameters in the SETUP menu.
This explanation addresses that of the Emec KMS MF, but can also be used for other electromagnetic models such as the AMS, TMS and VMS (excluding the PRIUS and PRISMA).
Setting CC per stroke
Enter here the value for cc/stroke obtained in "Test" mode (how to obtain this can be found under Calibration).
- Go to "SET (01) CC/ST". Then press the E key.
- Use the UP button to increase the flashing digit from one unit.
- Press the RIGHT key to move to the next digit.
- Press E key to save data and ESC to return to the main menu. Otherwise, press ESC to ignore data and return to the main menu.
Prior to level alarm (reserve)
This function defines a status prior to alarm notification, to inform the user that the dosed product is running low. The reserve value to be set should be calculated based on the amount of product remaining between the foot filter and the pump suction level.
- Go to "SET (03) LEVEL". Then press the E key. If all goes well, you will see "STOP LIT" here.
- Use the UP button to increase the flashing digit.
- Press the RIGHT key to move to the next digit.
- Press E key to save data and ESC to return to the main menu. Otherwise, press ESC to ignore data and return to the main menu.
During the alarm message, the pump continues dosing, but will indicate "ALARM N1".
STAND-BY signal
In this function, the pump can dose only when an external signal is received from the Standby input. This signal can be enabled as Normally Open contact, Normally Closed contact or can be disabled completely.
- Go to "SET (05) STANDBY". Then press the E button. Click through the options with the UP button.
- The options are as follows:
- Standby disabled
- Stand-By N.C. (Normally Closed)
- Stand-By N.O. (Normally Open)
- Press E key to save data and ESC to return to the main menu. Otherwise, press ESC to ignore data and return to the main menu.
OUT ALARM signal
This function allows managing the contact of the alarm output. The alarm can be set as Normally Open contact (N.O.) or as Normally Closed contact (N.C.)
- Go to "SET (06) OUT AL". Then press the E button. Click through the options with the UP button.
- The options are as follows:
- OUT ALARM N.C. (Normally Closed)
- OUT ALARM N.O. (Normally Open)
- Press E key to save data and ESC to return to the main menu. Otherwise, press ESC to ignore data and return to the main menu.
Alarm management
Use this function to enable or disable relay output for level alarm (levl) / standby (stby) / flow sensor (self) / ppm / percentage (PERC) / MLQ / Batch.
If the alarm is triggered for one or more events, the output relay is switched on, the pump displays the alarm status and may stop dosing.
If the alarm notification is NOT triggered for one or more events, the output relay is switched off, the pump displays the alarm status and will potentially stop dosing.
- Use the UP button to select the alarm message to be set.
- Use the RIGHT key to switch the alarm notification on (AND) or off (DI).
- Press E key to save data and ESC to return to the main menu. Otherwise, press ESC to ignore data and return to the main menu.
Setting the water meter
Use this function to set water meter information.
When you enter the number of pulses produced by the water meter, the pump will optimise its operating mode, when programmed to operate in PPM and will also update the statistics menu.
Follow these steps:
- Go to "SET (08) WMETER". Then press the E button.
- Use the UP button to select "Pulse/L" (Pulse/Litre) or "L/Pulse" (Liter/Pulse).
- Select "Pulse/L" for a water meter that produces many pulses.
- Select "L/Pulse" for a water meter that produces few pulses.
- If you set 000.0, the pump will not accept the signal and no data can be stored.
- Use the UP button to increase the flashing digit from one unit.
- Press the RIGHT key to move to the next digit.
- Press E key to save data and ESC to return to the main menu. Otherwise, press ESC to ignore data and return to the main menu.
External pulses
The first time the pump receives a pulse, it does not know the time between this pulse and the subsequent one. Therefore, the pump will operate as quickly as possible. The "Time-Out" function forces the pump to operate in this way once a certain amount of time has elapsed.
After the second pulse, the pump knows the time between one pulse and the next.
In this way, the dosage is optimised over time.
Change unit of measurement
This function allows you to choose between the unit of measurement litres or gallons.
- Go to "SET (10) UNIT". Then press the E button.
- Use the UP button to switch between the unit of measurement litres or gallons.
- Press E key to save data and ESC to return to the main menu. Otherwise, press ESC to ignore data and return to the main menu.
Setting start-up delay
It is possible to incorporate a delay time (between 0 and 10 minutes) after turning on the pump before dosing starts.
- Go to "SET (11) DELAY". Then press the E button.
- Use the UP button to select the alarm message to be set.
- Use the RIGHT key to move to the next digit.
- Press E key to save data and ESC to return to the main menu. Otherwise, press ESC to ignore data and return to the main menu.